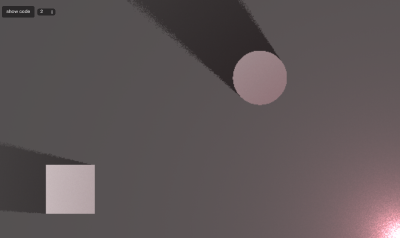
links

  • http://www.reddit.com/r/threejs/
    래딧의 threejs. 우측하단의 Useful resources들이 유용하다.

  • http://learningwebgl.com/blog/
    Native Webgl을 다루는 것으로 보인다. Lesson도 괜찮아보이고, WebGL around the net과 같은 글들이 계속 올라온다. 하지만 three.js보다 힘들겠지..

  • http://learningthreejs.com/blog/archives/
    webgl을 공부하는 사람 같이 보이는데 다양한 라이브러리들을 소개하기도 하고 자신의 공부도 올리는갯 같다. 잘 읽어봐야지.

  • THREEx Game Extensions for Three.js
    img

studying

  • http://kmyh.kr/webgl/webgl_interactive_particles.html
  • http://kmyh.kr/webgl/threejs_1.html
Tags : #threejs #webgl

koken

koken
워드프레스나 ghost같은 블로그 서비스인데 사진관리에 특화되어 있고, ui가 마음에 들어서 쓰고 있다. 기존의 다른 블로그들과 구조가 달라서 약간 편집에 애를 먹고 있지만 그런대로 만들어가는 재미가 있는 듯 싶다.
0Q에서 운영중이다.

Koken blueprint theme for developer

https://github.com/koken/blueprint
koken의 if문법을 어떻게 쓰는지 몰랐는데 blueprint를 보고 찾아냈다.

timeline.lens의 문법이 아래처럼 되있어서 각각의 경우를 어떻게 구분해야 하는지 몰랐었는데, blueprint를 보고 해결방법을 알아냈다.

medison theme의 timeline.lens

<koken:loop>
<article>
    <div class="event">
        <koken:event>
            <koken:include file="layouts/event_album.html" />
            <koken:include file="layouts/event_album_update.html" />
            <koken:include file="layouts/event_content.html" />
            <koken:include file="layouts/event_essay.html" />
        </koken:event>
    </div>
</article>
</koken:loop>

해결한 방법

<koken:loop>
        <koken:event>

            <koken:event_album>
            <article>
                <div class="event">
                <koken:include file="layouts/event_album.html" />
                </div>
            </article>
            </koken:event_album>

            <koken:event_essay>
            <article>
                <div class="event">
                <koken:include file="layouts/event_essay.html" />
                </div>
            </article>
            </koken:event_essay>
        </koken:event>

</koken:loop>
Tags : #koken

이번 목표로 설정!
(이미 열흘전에 정한거지만..)
http://glsl.herokuapp.com/e#13456.1
img

#ifdef GL_ES
precision mediump float;
#endif

#define STEPS 80
#define LIGHTPASSES 2
uniform float time;
uniform vec2 mouse;
uniform vec2 resolution;

vec2 c = vec2(0.5,0.5*resolution.y/resolution.x);
vec3 wallColor = vec3(1.,1.,1.);

/*by Olivier de Schaetzen (citiral)
haven't really seen anything like this before, so either I don't check enough shaders or I might have made something original once ;)
*/

//random function not by me, found it somewhere on the internet!
float rand(vec2 n)
{
  return 1. * 
     fract(sin(dot(n.xy, vec2(12.9898, 78.233)))* 43758.5453);
}

vec3 getColor(vec2 p)
{   
    if (p.x >= 0.1 && p.x <= 0.19 && p.y >= 0.1 && p.y <= 0.19) {
        return wallColor;
    }

    p.x += sin(time)*0.1;
    p.y += cos(time)*0.1;
    if (length(p-c) <= 0.05) {
        return wallColor;   
    }

    return vec3(0.3,0.3,0.3);
}

vec3 getLighting(vec2 p, vec2 lp)
{
    vec2 sp = p;
    vec2 v = (lp-p)/float(STEPS);

    for (int i = 0 ; i < STEPS ; i++) {
        if (getColor(sp) == wallColor) {
            return length(p-lp)/vec3(1.,1.,1.) + 1./length(p-lp)*0.075*vec3(1.0,0.5*(sin(time)+1.),0.6);
        }
        sp += v;
    }

    return vec3(1.0,1.0,1.0)+1./length(p-lp)*0.075*vec3(1.0,0.5*(sin(time)+1.),0.6);
}

vec3 blendLighting(vec2 p, vec2 lp)
{   
    vec2 r;
    vec3 c = vec3(0.,0.,0.);

    for (int i = 1 ; i <= LIGHTPASSES ; i++) {
        r = vec2(rand(sin(time*float(i))+p.xy)*0.03-0.015,rand(cos(time*float(i))+p.yx)*0.03-0.015);
        c += getLighting(p,lp+r)/float(LIGHTPASSES);
    }

    return c;
}

void main( void ) {

    vec2 p = gl_FragCoord.xy/resolution.xy;
    vec2 lp = mouse.xy;
    p.y *= resolution.y/resolution.x;
    lp.y *= resolution.y/resolution.x;  


    gl_FragColor = vec4(getColor(p)*blendLighting(p,lp),1.);
}
Tags : #shader

굉장하다!
img

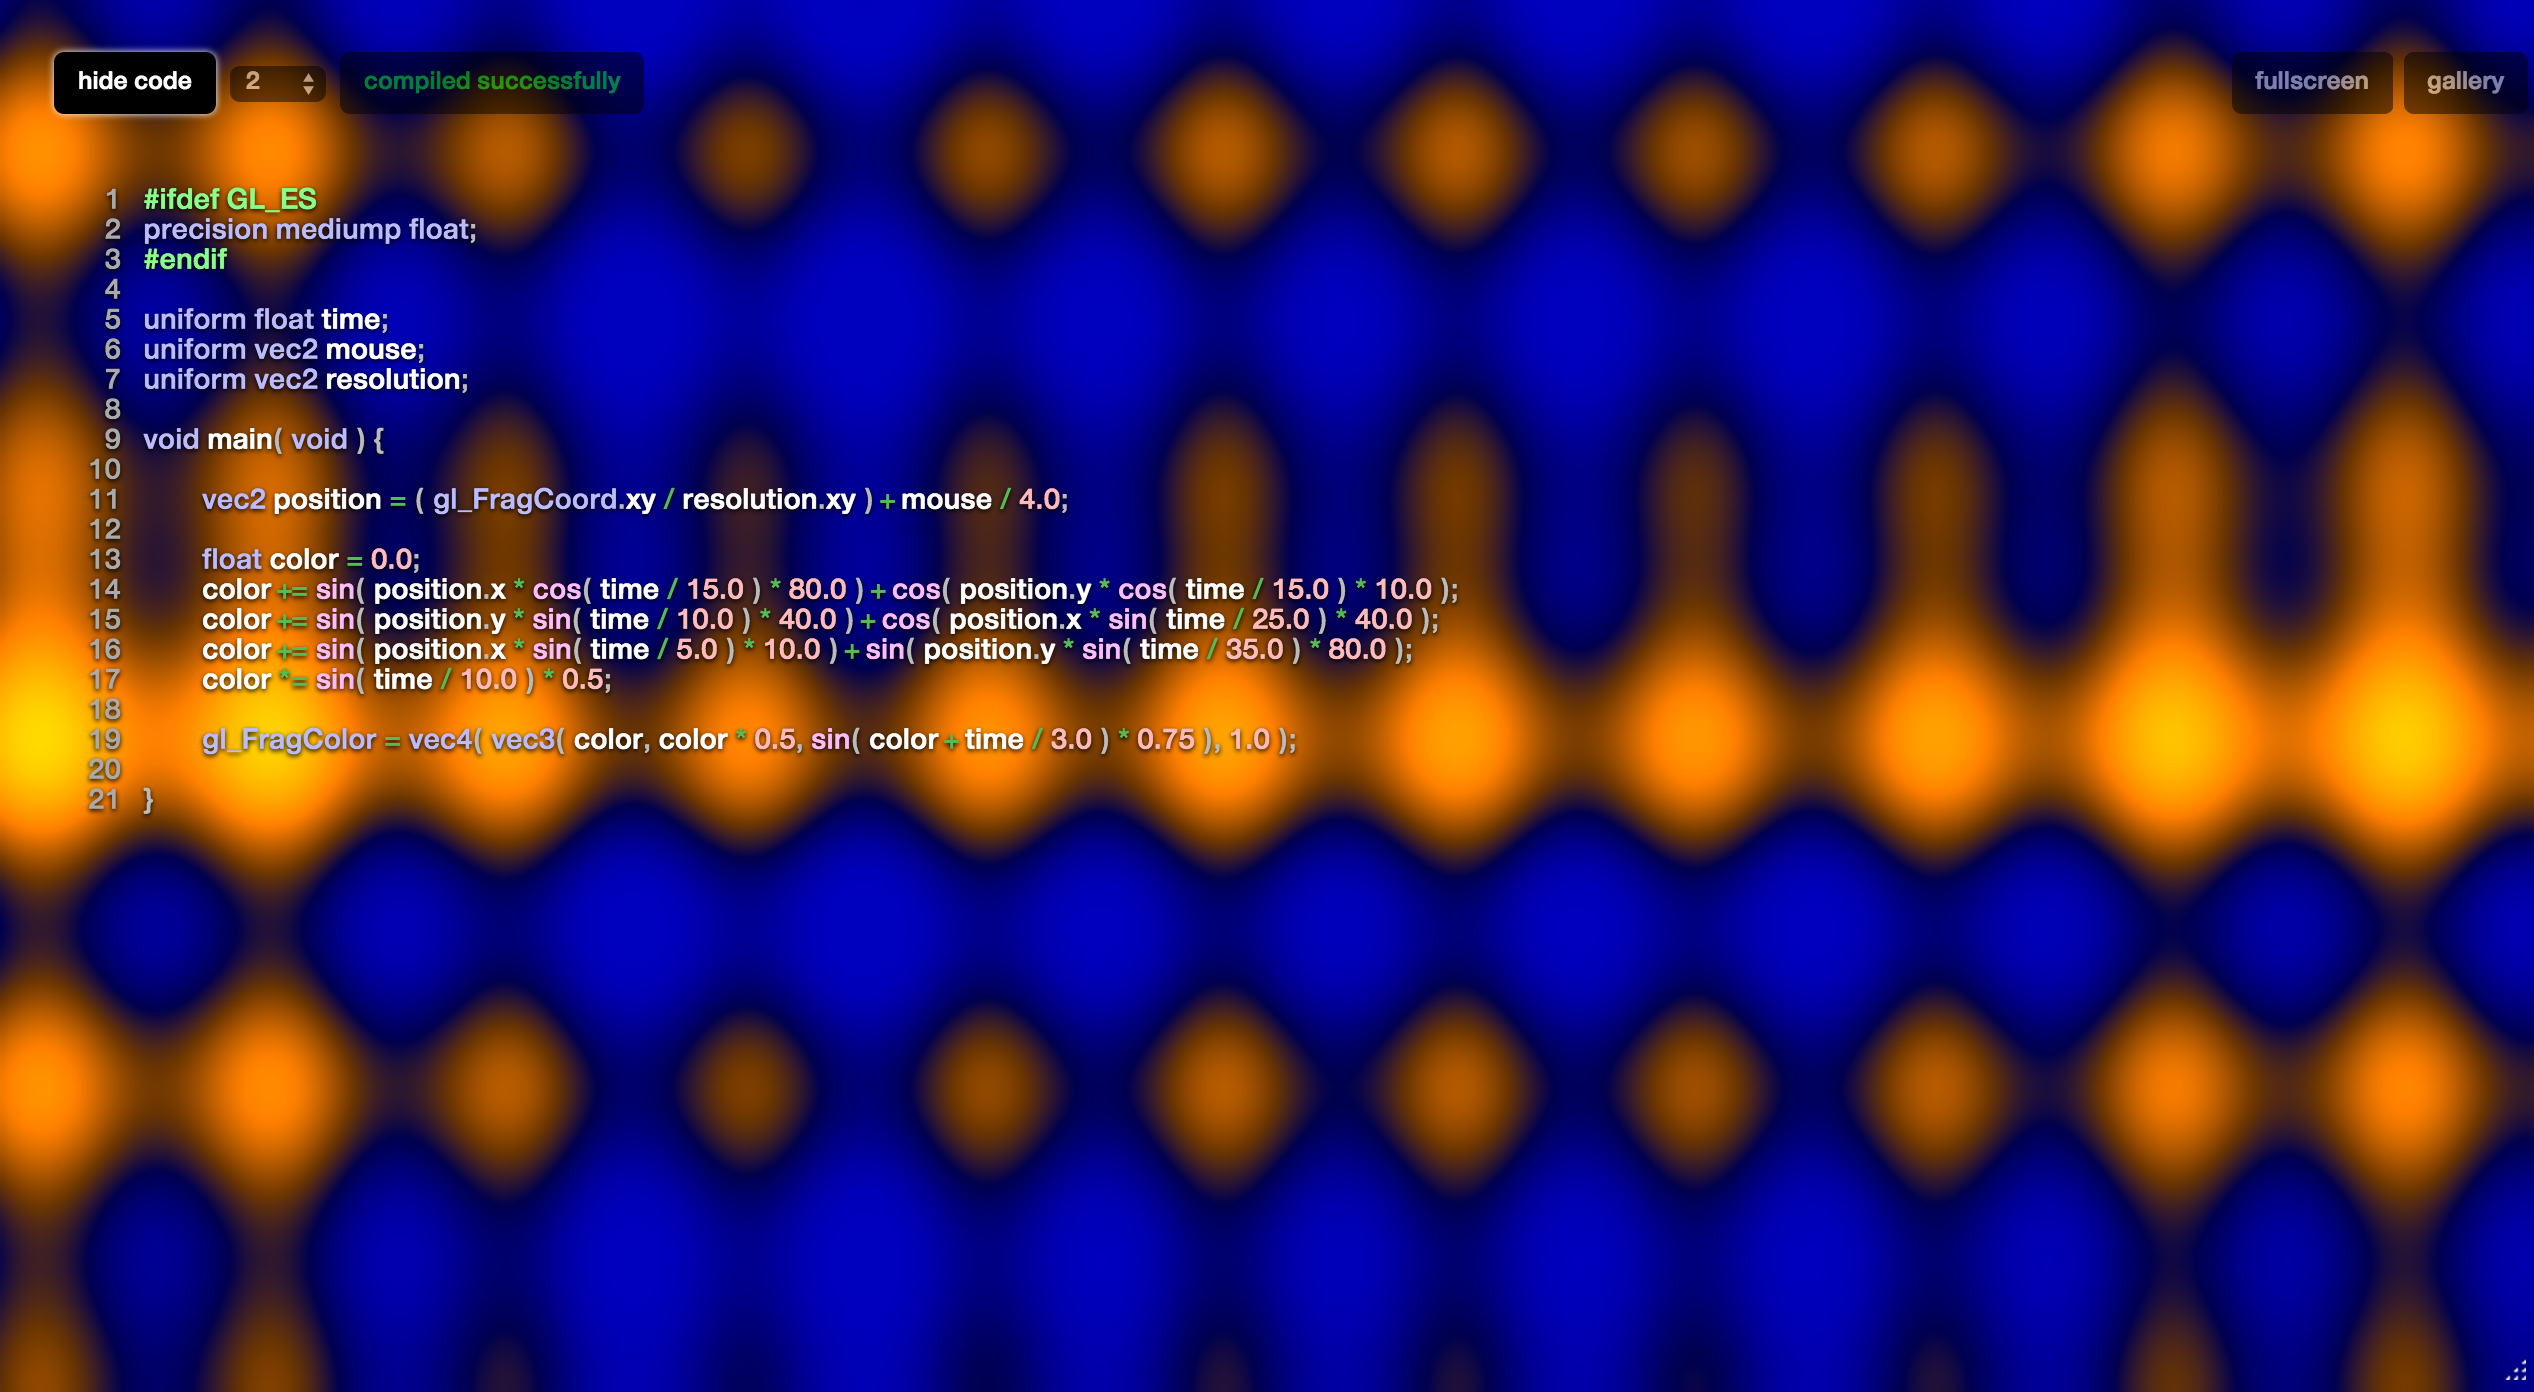
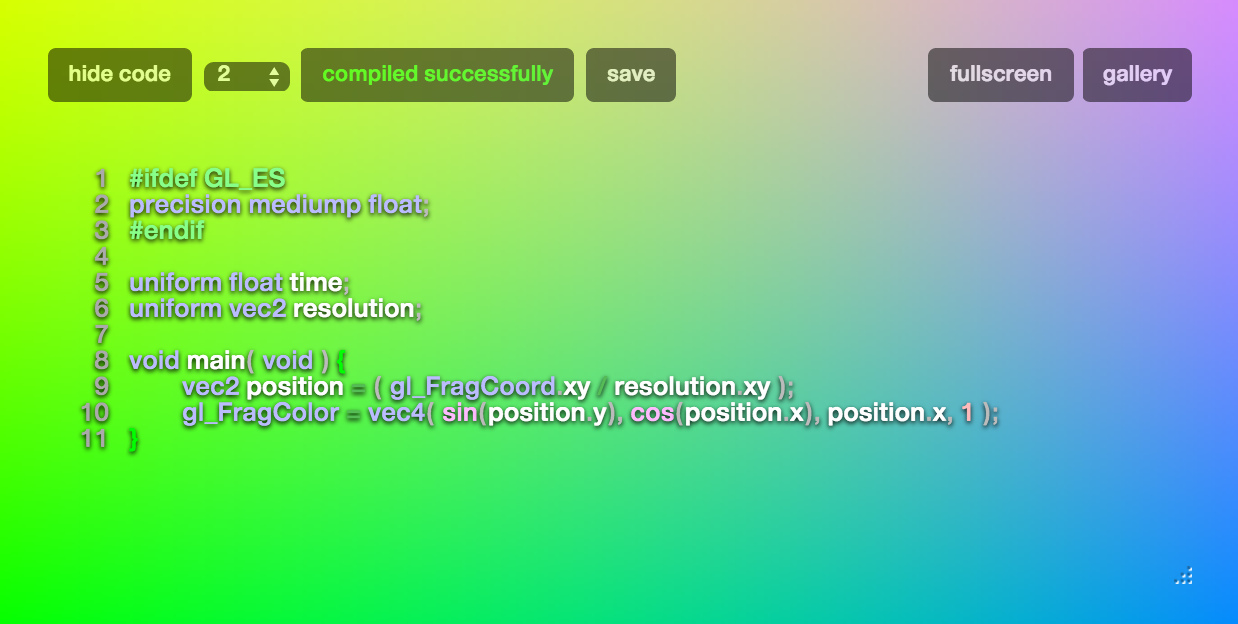
http://glslsandbox.com/e#20806
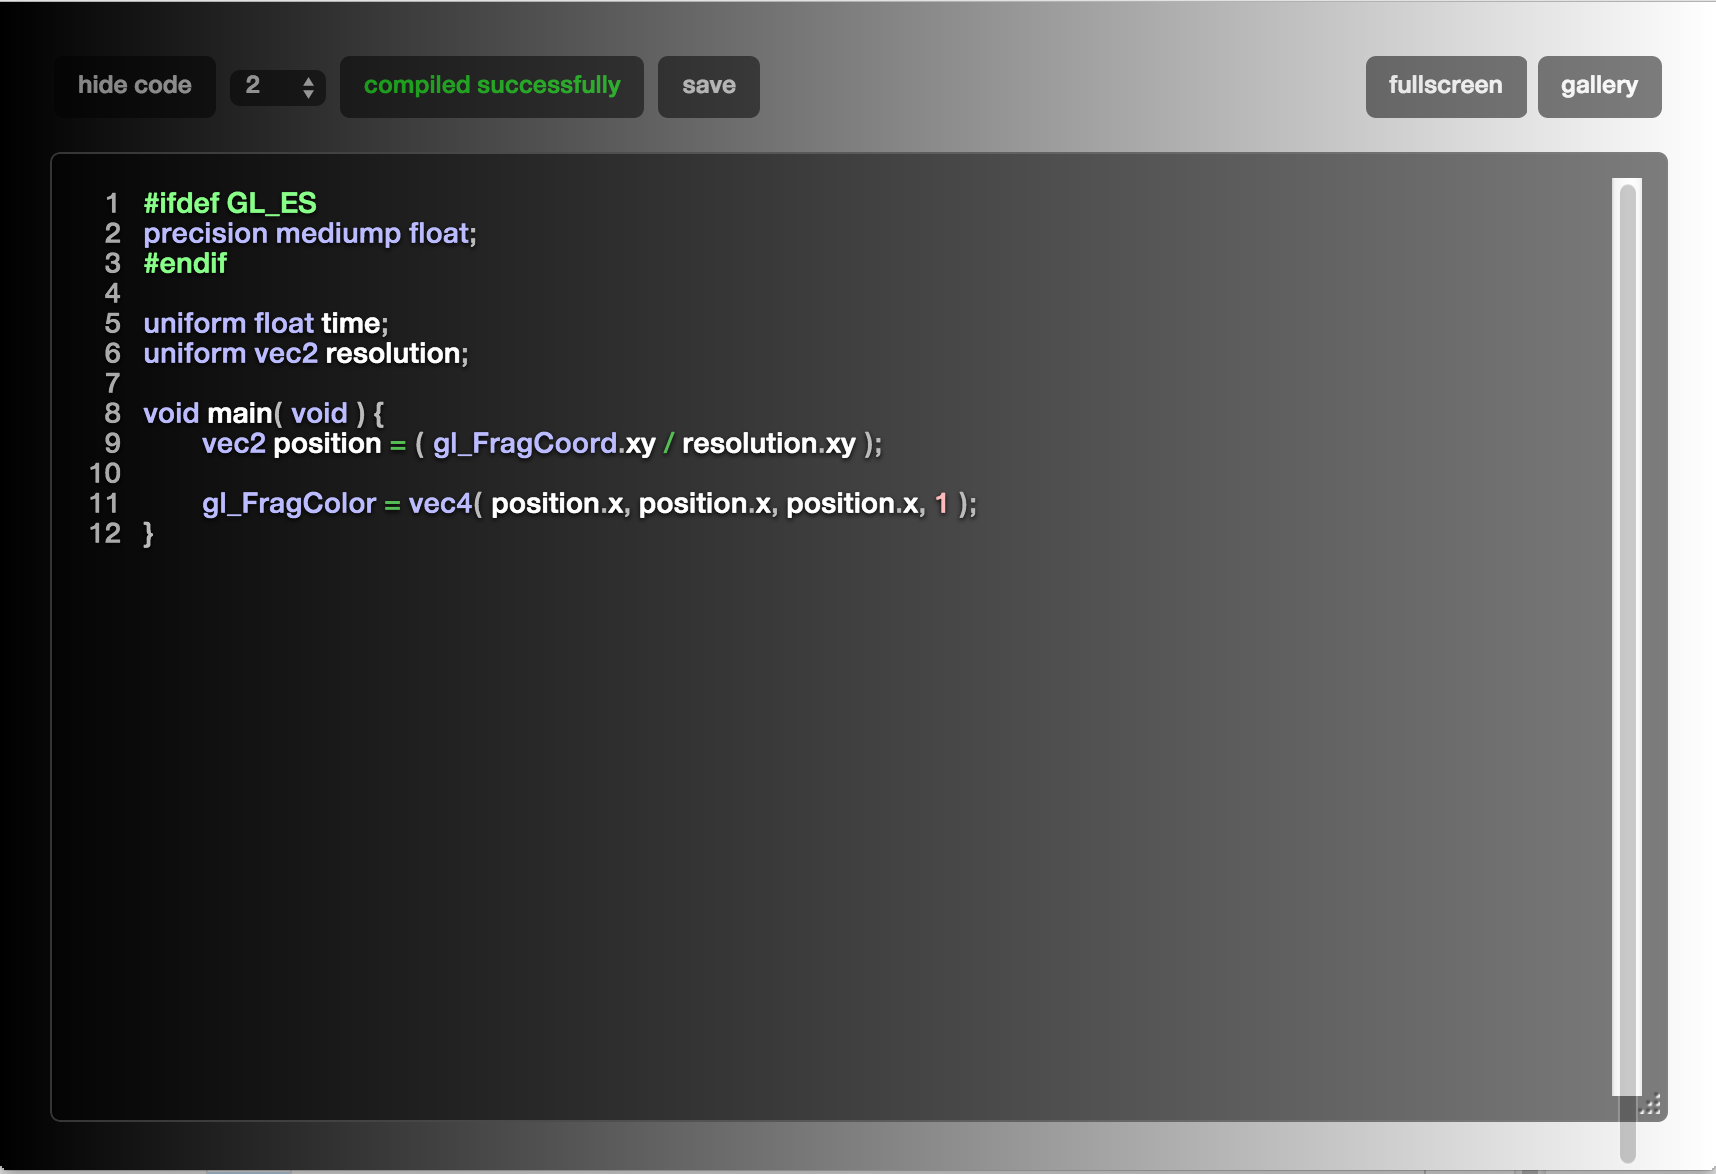
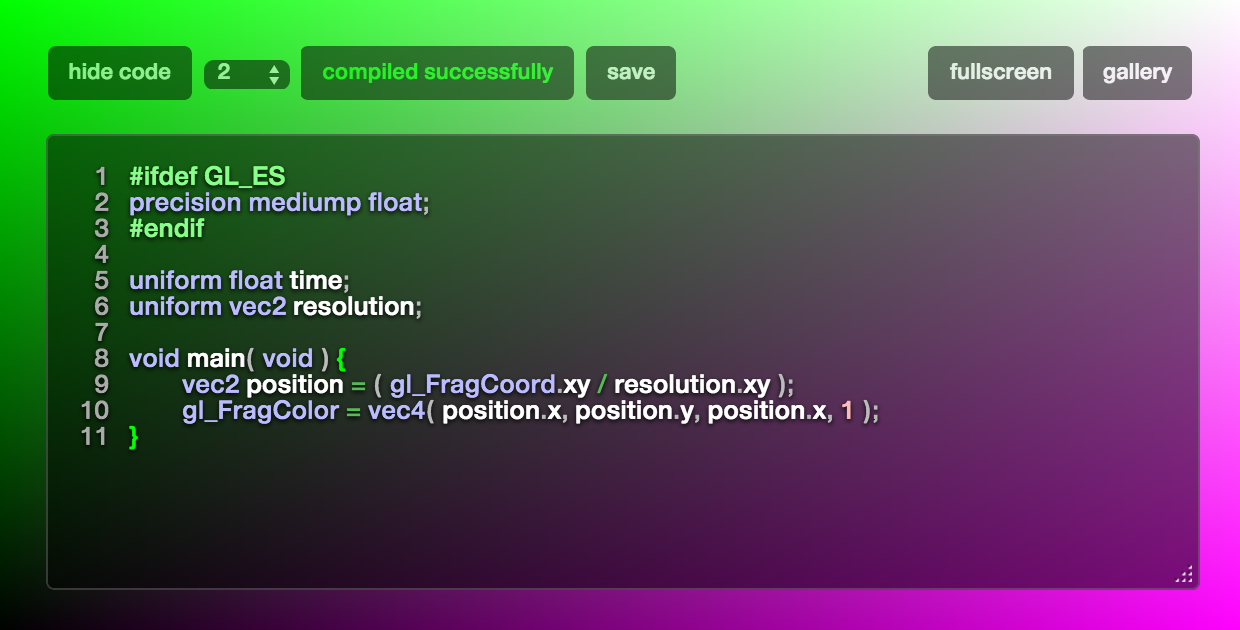
#ifdef GL_ES
precision mediump float;
#endif

uniform float time;
uniform vec2 mouse;
uniform vec2 resolution;

vec3 iMouse=vec3(time*50.0);
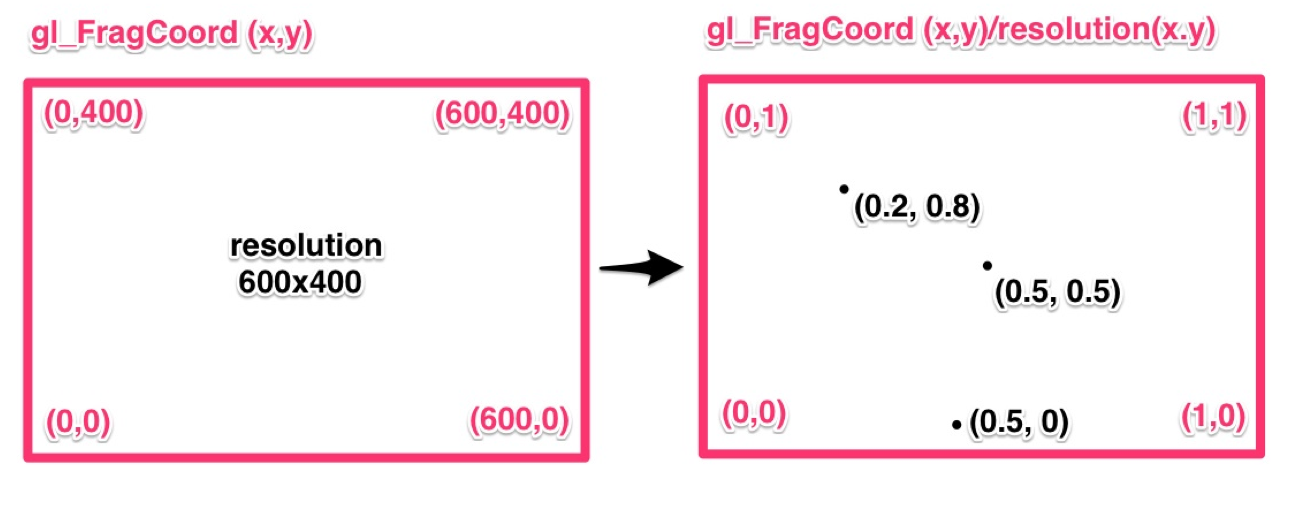
vec2 iResolution=resolution;
float iGlobalTime=time;


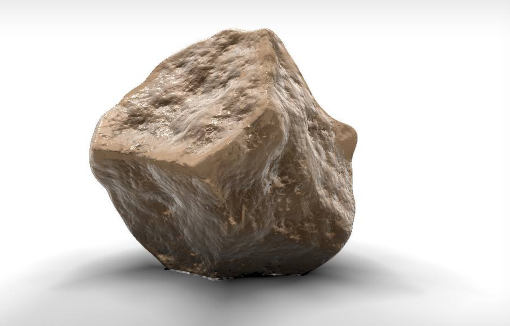
// "Wet stone" by Alexander Alekseev aka TDM - 2014
// License Creative Commons Attribution-NonCommercial-ShareAlike 3.0 Unported License.
// Mahmud Yuldashev modification mahmud9935@gmail.com

#define SMOOTH

const int NUM_STEPS = 32;
const int AO_SAMPLES = 3;
const vec2 AO_PARAM = vec2(1.2, 3.8);
const vec2 CORNER_PARAM = vec2(0.25, 40.0);
const float INV_AO_SAMPLES = 1.0 / float(AO_SAMPLES);
const float TRESHOLD    = 0.1;
const float EPSILON     = 1e-4;
const float LIGHT_INTENSITY = 0.25;
const vec3 RED      = vec3(1.0,0.7,0.7) * LIGHT_INTENSITY;
const vec3 ORANGE   = vec3(1.0,0.67,0.43) * LIGHT_INTENSITY;
const vec3 BLUE     = vec3(0.54,0.77,1.0) * LIGHT_INTENSITY;
const vec3 WHITE    = vec3(1.2,1.07,0.98) * LIGHT_INTENSITY;

const float DISPLACEMENT = 0.1;

// math
mat3 fromEuler(vec3 ang) {
    vec2 a1 = vec2(sin(ang.x),cos(ang.x));
    vec2 a2 = vec2(sin(ang.y),cos(ang.y));
    vec2 a3 = vec2(sin(ang.z),cos(ang.z));
    mat3 m;
    m[0] = vec3(a1.y*a3.y+a1.x*a2.x*a3.x,a1.y*a2.x*a3.x+a3.y*a1.x,-a2.y*a3.x);
    m[1] = vec3(-a2.y*a1.x,a1.y*a2.y,a2.x);
    m[2] = vec3(a3.y*a1.x*a2.x+a1.y*a3.x,a1.x*a3.x-a1.y*a3.y*a2.x,a2.y*a3.y);
    return m;
}
float hash11(float p) {
    return fract(sin(p * 727.1)*43758.5453123);
}
float hash12(vec2 p) {
    float h = dot(p,vec2(127.1,311.7)); 
    return fract(sin(h)*43758.5453123);
}
vec3 hash31(float p) {
    vec3 h = vec3(1275.231,4461.7,7182.423) * p;    
    return fract(sin(h)*43758.543123);
}

// 3d noise
float noise_3(in vec3 p) {
    //p += 123.0;
    vec3 i = floor(p);
    vec3 f = fract(p);  
    vec3 u = f*f*(3.0-2.0*f);

    vec2 ii = i.xy + i.z * vec2(5.0);
    float a = hash12( ii + vec2(0.0,0.0) );
    float b = hash12( ii + vec2(1.0,0.0) );    
    float c = hash12( ii + vec2(0.0,1.0) );
    float d = hash12( ii + vec2(1.0,1.0) ); 
    float v1 = mix(mix(a,b,u.x), mix(c,d,u.x), u.y);

    ii += vec2(5.0);
    a = hash12( ii + vec2(0.0,0.0) );
    b = hash12( ii + vec2(1.0,0.0) );    
    c = hash12( ii + vec2(0.0,1.0) );
    d = hash12( ii + vec2(1.0,1.0) );
    float v2 = mix(mix(a,b,u.x), mix(c,d,u.x), u.y);

    return max(mix(v1,v2,u.z),0.0);
}

// fBm
float fbm3(vec3 p, float a, float f) {
    return noise_3(p);
}

float fbm3_high(vec3 p, float a, float f) {
    float ret = 0.0;    
    float amp = 1.0;
    float frq = 1.0;
    for(int i = 0; i < 4; i++) {
        float n = pow(noise_3(p * frq),2.0);
        ret += n * amp;
        frq *= f;
        amp *= a * (pow(n,0.2));
    }
    return ret;
}

// lighting
float diffuse(vec3 n,vec3 l,float p) { return pow(max(dot(n,l),0.0),p); }
float specular(vec3 n,vec3 l,vec3 e,float s) {    
    float nrm = (s + 8.0) / (3.1415 * 8.0);
    return pow(max(dot(reflect(e,n),l),0.0),s) * nrm;
}

// distance functions
float plane(vec3 gp, vec4 p) {
    return dot(p.xyz,gp+p.xyz*p.w);
}
float sphere(vec3 p,float r) {
    return length(p)-r;
}
float capsule(vec3 p,float r,float h) {
    p.y -= clamp(p.y,-h,h);
    return length(p)-r;
}
float cylinder(vec3 p,float r,float h) {
    return max(abs(p.y/h),capsule(p,r,h));
}
float box(vec3 p,vec3 s) {
    p = abs(p)-s;
    return max(max(p.x,p.y),p.z);
}
float rbox(vec3 p,vec3 s) {
    p = abs(p)-s;
    return length(p-min(p,0.0));
}
float quad(vec3 p,vec2 s) {
    p = abs(p) - vec3(s.x,0.0,s.y);
    return max(max(p.x,p.y),p.z);
}

// boolean operations
float boolUnion(float a,float b) { return min(a,b); }
float boolIntersect(float a,float b) { return max(a,b); }
float boolSub(float a,float b) { return max(a,-b); }

// smooth operations. thanks to iq
float boolSmoothIntersect(float a, float b, float k ) {
    float h = clamp(0.5+0.5*(b-a)/k, 0.0, 1.0);
    return mix(a,b,h) + k*h*(1.0-h);
}
float boolSmoothSub(float a, float b, float k ) {
    return boolSmoothIntersect(a,-b,k);
}   

// world
float rock(vec3 p) {    
    float d = sphere(p,1.0);    
    for(int i = 0; i < 9; i++) {
        float ii = float(i);
        float r = 2.5 + hash11(ii);
        vec3 v = normalize(hash31(ii) * 2.0 - 1.0);
        #ifdef SMOOTH
        d = boolSmoothSub(d,sphere(p+v*r,r * 0.8), 0.03);
        #else
        d = boolSub(d,sphere(p+v*r,r * 0.8));
        #endif        
    }
    return d;
}

float map(vec3 p) {
    float d = rock(p) + fbm3(p*4.0,0.4,2.96) * DISPLACEMENT;
    d = boolUnion(d,plane(p,vec4(0.0,1.0,0.0,1.0)));
    return d;
}

float map_detailed(vec3 p) {
    float d = rock(p) + fbm3_high(p*4.0,0.4,2.96) * DISPLACEMENT;
    d = boolUnion(d,plane(p,vec4(0.0,1.0,0.0,1.0)));
    return d;
}

// tracing
vec3 getNormal(vec3 p, float dens) {
    vec3 n;
    n.x = map_detailed(vec3(p.x+EPSILON,p.y,p.z));
    n.y = map_detailed(vec3(p.x,p.y+EPSILON,p.z));
    n.z = map_detailed(vec3(p.x,p.y,p.z+EPSILON));
    return normalize(n-map_detailed(p));
}
vec2 getOcclusion(vec3 p, vec3 n) {
    vec2 r = vec2(0.0);
    for(int i = 0; i < AO_SAMPLES; i++) {
        float f = float(i)*INV_AO_SAMPLES;
        float hao = 0.01+f*AO_PARAM.x;
        float hc = 0.01+f*CORNER_PARAM.x;
        float dao = map(p + n * hao) - TRESHOLD;
        float dc = map(p - n * hc) - TRESHOLD;
        r.x += clamp(hao-dao,0.0,1.0) * (1.0-f);
        r.y += clamp(hc+dc,0.0,1.0) * (1.0-f);
    }    
    r.x = pow(clamp(1.0-r.x*INV_AO_SAMPLES*AO_PARAM.y,0.0,1.0),0.5);
    r.y = clamp(r.y*INV_AO_SAMPLES*CORNER_PARAM.y,0.0,1.0);
    return r;
}

vec2 spheretracing(vec3 ori, vec3 dir, out vec3 p) {
    vec2 td = vec2(0.0);
    for(int i = 0; i < NUM_STEPS; i++) {
        p = ori + dir * td.x;
        td.y = map(p);
        if(td.y < TRESHOLD) break;
        td.x += (td.y-TRESHOLD) * 0.9;
    }
    return td;
}

// stone
vec3 getStoneColor(vec3 p, float c, vec3 l, vec3 n, vec3 e) {
    c = min(c + pow(noise_3(vec3(p.x*20.0,0.0,p.z*20.0)),70.0) * 8.0, 1.0);
    float ic = pow(1.0-c,0.5);
    vec3 base = vec3(0.42,0.3,0.2) * 0.6;
    vec3 sand = vec3(0.51,0.41,0.32);
    vec3 color = mix(base,sand,c);

    float f = pow(1.0 - max(dot(n,-e),0.0), 1.5) * 0.75 * ic;
    color = mix(color,vec3(1.0),f);    
    color += vec3(diffuse(n,l,0.5) * WHITE);
    color += vec3(specular(n,l,e,8.0) * WHITE * 1.5 * ic);
    n = normalize(n - normalize(p) * 0.4);    
    color += vec3(specular(n,l,e,80.0) * WHITE * 1.5 * ic);    
    return color;
}

// main
void main(void) {
    vec2 iuv = gl_FragCoord.xy / iResolution.xy * 2.0 - 1.0;
    vec2 uv = iuv;
    uv.x *= iResolution.x / iResolution.y;    
    float time = iGlobalTime * 0.3;

    // ray
    vec3 ang = vec3(0.0,0.2,time);
    if(iMouse.z > 0.0) ang = vec3(0.0,clamp(2.0-iMouse.y*0.01,0.0,3.1415),iMouse.x*0.01);
    mat3 rot = fromEuler(ang);

    vec3 ori = vec3(0.0,0.0,2.8);
    vec3 dir = normalize(vec3(uv.xy,-2.0));    
    ori = ori * rot;
    dir = dir * rot;

    // tracing
    vec3 p;
    vec2 td = spheretracing(ori,dir,p);
    vec3 n = getNormal(p,td.y);
    vec2 occ = getOcclusion(p,n);
    vec3 light = normalize(vec3(0.0,1.0,0.0)); 

    // color
    vec3 color = vec3(1.0);    
    if(td.x < 3.5 && p.y > -0.89) color = getStoneColor(p,occ.y,light,n,dir);
    color *= occ.x;

    // background
    color = mix(vec3(1.0),color,step(td.y,1.0));

    // post
    float vgn = smoothstep(1.2,0.7,abs(iuv.y)) * smoothstep(1.1,0.8,abs(iuv.x));
    color *= 1.0 - (1.0 - vgn) * 0.15;  
    gl_FragColor = vec4(color,1.0);
}
Tags : #shader

개요

위와 같은 동적 페이지를 만들기 위한 방법을 기록해보겠습니다.

방법 자체는 Isotope플러그인의 filter기능으로 구현했습니다. Isotope – Filtering을 보시는게 더 쉽고 간단할 수 있습니다.

위의 페이지는 Types플러그인 이용하여 아래의 기능으로 이루어졌습니다.

custom post 생성 : ‘link’

taxonomy 생성 : ‘linktag

‘link’ custom post를 ‘linktag’ taxonomy와 연결

아래 소스는 http://blogurl.com/link 로 접속했을 때 출력되는 페이지를 overdrive하기 위해 만든 archive-link.php이고, 이 파일의 loop안에서 content-linkthumb.php를 불러오게 됩니다.

archive-link.php

    <?php
    /**
     * The template for displaying Archive pages.
     *
     */

    get_header(); ?>
    <?php
    //custom post name : link
    //tag(taxonomy) : linktag
    //
    //archive-link.php는 link 라는 custom post를 출력하는 페이지.
    //이 파일이 없을 경우 archive.php가 출력되는데, 테마 폴더 안에 이 파일을 만들면 http://blogurl.com/link로 접근할 때
    //archive.php대신 출력된다.

    $args = array(
        'post_type' => 'link',
        'posts_per_page' => -1
        );
    $the_query = new WP_Query( $args ); // 포스트 갯수는 설정에서 지정해 둔 숫자로 출력되는데 전체 포스트를 출력하기 위해 wp_query를 새로 지정해줌.
    ?>

    <section id="primary" class="content-area">

        <h2>A.some.link</h2>

        <div id="filters" class="button-group">
            <button data-filter="*">show all</button>
            <?php
            // 페이지 상단 버튼 태그 버튼 그룹.
            // taxonomy 'linktag'의 terms들을 출력한다.
            $args = array(
                'orderby' => 'name',
                'taxonomy' => 'linktag',
                'hide_empty' => 1,
                'order' => 'ASC'
                );
            $categories = get_categories($args);
            foreach($categories as $category) {
                echo '<button data-filter="'.$category->slug.'">'.$category->name.'</button>';
            }
            ?>
        </div>
        <div class="linkthumbs">
            <?php
            if ( $the_query->have_posts() ) :
                while ( $the_query->have_posts() ) : $the_query->the_post();
            get_template_part( 'content', 'linkthumb'); // content-linkthumb.php를 인클루드한다.
            endwhile;
            endif;
            wp_reset_postdata();
            ?>

        </div>
    </section>
    <script src="http://dev.0-q.me/js/isotope.pkgd.min.js"></script>
    <script>

    jQuery( document ).ready( function( $ ) {
        var $container = $('.linkthumbs');
        var currentFilter = '*';
        $container.isotope({
          itemSelector: '.linkthumbs article',
          layoutMode: 'fitRows'
        });
        $('#filters').on( 'click', 'button', function() {
            //#filters아래의 button을 클릭했을 때 이벤트.

            var filterValue = $(this).attr('data-filter') ; // 클릭한 버튼의 data-filter을 확인
            if(currentFilter != filterValue ){ // 현재의 filterValue와 클릭한 filterValue를 확인하여 다를때 실행.
                currentFilter = filterValue;
                $(this).siblings().removeClass('selected');
                $(this).toggleClass('selected'); // 클릭한 버튼에 selected 클래스를 지정하고 나머지 버튼에서 해당 클래스를 제거
                filterValue = $(this).attr('data-filter') == '*' ? '*' : '.tag-'+$(this).attr('data-filter') // filterValue확인
                $container.isotope({ filter: filterValue }); // isotope에서 해당 데이터만 보이게 함.
            }
        });
        $('.tags').on( 'click', 'a', function() {
            // .tags아래의 버튼을 클릭할때 data-filter속성을 확인하여 jquery의 trigger을 이용. 상단의 태그들에서 같은 버튼을 클릭한 효과를 낸다.
            var thisValue = $(this).attr('data-filter') == '*' ? '*' : $(this).attr('data-filter') ;
            $('#filters').find("[data-filter='" + thisValue + "']").trigger('click');
            //console.log(thisValue); // 디버깅 용도
        });

    });
    </script>

    <?php get_sidebar('sidebar-1'); ?>
    <?php get_footer(); ?>
    `</pre>

content-linkthumb.php

<?php
    /**
     */
    $linkurl = types_render_field("links", array("raw"=>"true")); //types에서 지정한 links 항목을 $linkurl에 불러온다.
    if($linkurl){
        $linkurl = addhttp($linkurl); // http://가 없을 시 붙여주는 펑션(functions.php에서 만들어 줌.)
    }
    ?>
    <article id="post-<?php the_ID(); ?>" <?php post_class(); ?>>
        <header class="entry-header">
            <div class="entry-meta">
                <span class="entry-in-time" style="display:none;"> <?php the_time('Y.m.d'); ?> </span>
                <span class="tags"><?php

                $linktags = wp_get_object_terms($post->ID, 'linktag');
                // taxonomy : 'linktag'의 terms들을 출력한다.
                foreach($linktags as $category) {
                    echo '<a data-filter="'.$category->slug.'" href="#">'.$category->name.'</a>';
                }

                ?></span>
            </div>
            <h3 class="entry-title">
                <a href="<?php echo $linkurl ?>" title="<?php echo 'go to '.$linkurl ?>" rel="bookmark" target="_blank" class="newwindow">
                    <?php the_title(); ?>
                </a>
            </h3>

        </header>

        <div class="entry-summary">

            <?php if ( has_post_thumbnail() && ! post_password_required() ) : ?>
            <div class="post-thumbnail">
                <a href="<?php echo $linkurl ?>" title="<?php echo 'go to '.$linkurl ?>" rel="bookmark" target="_blank" class="newwindow"><?php the_post_thumbnail();?></a>
            </div>

            <?php elseif($linkurl != ''): ?>
            <a href="<?php echo $linkurl ?>" title="<?php echo 'go to '.$linkurl ?>" rel="bookmark" target="_blank" class="newwindow">
            <?php echo do_shortcode('[stwthumb]'.$linkurl.'[/stwthumb]' ); //shrinktheweb 플러그인을 이용해 썸네일을 생성?>
            </a>
            <?php endif; ?>

        </div>

    </article>
Tags : #wordpress

facebook처럼 링크를 던져넣었을때 스크린샷이 생성되는건 워드프레스 유저들이 보기에 참으로 부러운 기능인것 같다. 찾아보면 이를 원하는 질문들이 많은데, 그동안 비슷한 방법은 wordpress.com에서 제공하는 기능이다.

1. mshot 방식

http://s.wordpress.com/mshots/v1/http%3A%2F%2Fprothemedesign.com%2F?w=250

이런식으로 스크립트를 써주면 이미지가 생성된다. 이를 이용해 워드프레스 상에서 입력한 url을 저 url부분에 넣어서 스크린샷을 동적으로 보여줄 수 있고, 이를 이용한 플러그인이 많은데 나는 bm-shot이라는 플러그인을 썻다.

코드를 보면 이미지가 저 워드프레스 서버에 저장이 되고 이를 불러오는 방식인데, 한번 생성되면 느리진 않지만 나중에 다시 페이지를 읽으면 서버에서 지워졌는지 다시 지워지는 단점이 있다.

2. Shrink The Web

http://www.shrinktheweb.com/

더 좋은 방법이 없나 계속 찾다보니 이런 서비스가 있었다. 저 서비스에 가입을 하고 제공하는 코드로 url을 전송하면 이미지가 생성된다. 이 서비스에서 제공하는 Shrink The Web 플러그인을 이용했더니 좋은점은 생성된 이미지가 내 서버에 저장된다는 것이다.

무료와 유료 계정의 차이가 있지만 무료 계정으로도 한달에 5000개의 쿼리를 처리할 수 있다니 나쁘지 않다. 현재 왼쪽의 a some link부분을 이 기능으로 사용 중.

2-1. 생성된 썸네일을 thumbnail로 등록하기

2번의 방법을 계속 써 왔는데 이 방식은 매번 stw의 숏코드를 불러오는데 이 코드에서는 해당 파일이 생성되어 있는지 확인하고 그것 보여주거나, 캐시 기간이 지났을 경우 다시 서비스에 접속해서 썸네일을 생성한다. 이 방식이 필요한 사람도 있겠지만 내 경우에는 속도 문제도 있고 굳이 그렇께까지 할 필요를 못느껴서 차라리 post에 썸네일로 등록하고 싶었는데, 한참을 헤멘 끝에 간단히 해결하였다.

먼저 테마의 functions.php에 아래 코드를 추가한다.

function save_thumbnail($imageurl){
    global $post;
    $post_id = $post->ID;  
    $image_url = $imageurl;
    $upload_dir = wp_upload_dir();
    $image_data = file_get_contents($image_url);
    $filename = basename($image_url);
    if(wp_mkdir_p($upload_dir['path']))
    $file = $upload_dir['path'] . '/' . $filename;
    else
    $file = $upload_dir['basedir'] . '/' . $filename;
    file_put_contents($file, $image_data);

    $wp_filetype = wp_check_filetype($filename, null );
    $attachment = array(
        'post_mime_type' => $wp_filetype['type'],
        'post_title' => sanitize_file_name($filename),
        'post_content' => '',
        'post_status' => 'inherit'
    );
    $attach_id = wp_insert_attachment( $attachment, $file, $post_id );
    require_once(ABSPATH . 'wp-admin/includes/image.php');
    $attach_data = wp_generate_attachment_metadata( $attach_id, $file );
    wp_update_attachment_metadata( $attach_id, $attach_data );

    set_post_thumbnail( $post_id, $attach_id );
}

그리고 ‘/wp-content/plugins/shrinktheweb-website-preview-plugin/stw-wp-thumbnails.php’ 파일을 열어 line:437에 아래와 같은 부분이 있는데,

if ($useCachedThumb) {
return STWWT_plugin_getCacheURL($cacheFilename, $errorThumb);
} else {
    // File is not in cache, or we need a live version, so return it.
    return STWWT_fetch_requestThumbnailCapture($args);
}

save_thumbnail을 추가하여 아래처럼 바꾼다.

if ($useCachedThumb) {
save_thumbnail($cachePath);
return STWWT_plugin_getCacheURL($cacheFilename, $errorThumb);
} else {
    // File is not in cache, or we need a live version, so return it.
    return STWWT_fetch_requestThumbnailCapture($args);
}

참고 : wp insert post – How do I set a featured image (thumbnail) by image URL when using wp_insert_post()? – WordPress Development Stack Exchange

Tags : #wordpress

당연히 되는 줄 알았는데 안되길래 찾아보니 이런 방법이 있다.
크롬 Developer Tools에서 Console에 아래 내용을 복사해서 넣으면 jQuery의 기능을 사용할 수 있다.

var jq = document.createElement('script');
jq.src = "//ajax.googleapis.com/ajax/libs/jquery/1/jquery.min.js";
document.getElementsByTagName('head')[0].appendChild(jq);
// ... give time for script to load, then type.
jQuery.noConflict();
Tags : #jquery

STEP 1. Shader code 직접 넣어보기

Glsl sandbox는 glsl의 온라인상에서 Pixel Shader를 테스트하는 곳이라고 할 수 있다. 접속해서 Create new effect! 버튼을 누르면 다음의 화면이 나온다.

image

마우스의 움직임에 따라 패턴이 달라지는 기본 코드인데, 지금 이해하기에는 어려움이 있으니 아래의 코드를 복사해 넣자.
다음의 기본적인 코드를 복사해 붙여넣자.

#ifdef GL_ES
precision mediump float;
#endif

uniform float time;
uniform vec2 resolution;

void main( void ) {
    vec2 position = ( gl_FragCoord.xy / resolution.xy );
    gl_FragColor = vec4( 1, 1, 1, 1 );
}

흰색 화면이 나온다. 가장 마지막줄의 gl_FragColor 를 바꿔보자

gl_FragColor = vec4( 0, 0, 0, 1 );

검은 화면이 나온다. 0.5를 넣어주면 회색이 나온다. 다양한 숫자를 넣어보자.
gl_FragColor은 화면의 색상을 나타내고 vec4 는 4가지의 구성요소를 갖는다고 할 수 있다.

gl_FragColor = vec4( R, G, B, A );

이런 형식으로 값을 입력을 받고, glsl에서 색상의 범위는 0~255가 아닌 0~1이다. R, G, B자리에 원하는 숫자를 넣어보자. 단색은 너무 지루하니 변화를 줘보도록 하자. 그라데이션은 어떨까. 그라데이션을 위해 position을 이용해 보자.

vec2 position = ( gl_FragCoord.xy / resolution.xy );

position을 정의한 부분을 보자. 이것을 풀어서 쓰면

position.x = gl_FragCoord.x / resolution.x;
position.y = gl_FragCoord.y / resolution.y;

라고 할 수 있는데 glsl의 간편한 언어의 특징이라고 생각하자. 이 부분을 보면 gl_FragCoord를 resolution으로 나누고 있다. gl_FragCoord는 현재 frame buffer안의 픽셀 조각들의 좌표를 가리키는데, 쉽게 말해 픽셀의 위치를 나타낸다고 할 수 있다. 왼쪽 위부터 1부터 오른쪽 끝으로 갈수록 400, 500증가할것이다. resolution은 말 그대로 현재 화면의 크기이다.

즉, vec2 position = gl_FragCoord.xy / resolution.x 이 값은 화면 어디에서나 0~1사이의 값을 갖는 점의 집합이라고 할 수 있겠다.

image

한번 이를 확인해 보도록 하자. gl_FragColor의 R, G, B에 position.x를 넣어보자.

gl_FragColor = vec4( position.x, position.x, position.x, 1 );

image

좌에서 우로 그라데이션이 생겼다. 반대의 그라데이션을 만들려면 어떻게 해야할까? 그렇다.
다음과 같이 하면 된다.

gl_FragColor = vec4( 1- position.x, 1- position.x, 1- position.x, 1 );

하지만 에러가 생긴다. 이는 position.x값이 실수이기 때문에 1(정수)에서 position.x(실수)를 뺄 수 없기 때문이다. 이럴 땐 1.0으로 바꿔주면 된다.

gl_FragColor = vec4( 1.0- position.x, 1.0- position.x, 1.0- position.x, 1 );

가끔씩 glslsandbox에서 에러가 날 때가 있는데 딱히 이유나 지점을 표시해 주지 않기 때문에 알 수 없는 일이 있다. 이럴 땐 실수가 들어가야 하는 곳에 정수가 들어간 것은 아닌지 의심해 보자.

STEP 2. position 을 이용한 색 변형

‘position’을 이용해서 다음처럼 여러가지로 바꿔보는게 가능하다.

gl_FragColor = vec4( position.x, position.y, position.x, 1 );

image

이런식으로 sin이나 cos을 이용하는 것도 가능하다.
gl_FragColor = vec4( sin(position.y), cos(position.x), position.x, 1 );

image

sin이나 cos을 이용할 때 재밌는 것은 인자를 아주 큰 수로 만들어주면 반복이 된다는 것이다.
gl_FragColor = vec4( sin(position.y*20.0), cos(position.x*12.0), tan(position.x), 1 );

image

숫자를 바꿔가며 자신만의 이미지를 만들어보자.

Tags : #shader

http://glsl.heroku.com/e#19224.0 공부해봄
image

#ifdef GL_ES
precision mediump float;
#endif

uniform float time;
uniform vec2 mouse;
uniform vec2 resolution;

float rand(vec2 v){
    return fract(sin(dot(v.xy,vec2(33.9898,78.233))) * 43758.56);
}
void main( void ) {

    vec2 p = (gl_FragCoord.xy * 2.0 - resolution) / resolution.y ;

    float c = 0.0;
    for(int i = 0; i <20; i++){
        float f = float(i);
        p +=  // 뒤에 나올 컬러값을 pixel값에 더해 해상도를 높인다. 이부분을 주석처리 해보면 어떤 역할을 하는지 알 수 있다.
        c += max(0.5 - length(vec2(rand(vec2(f, 2.0)), rand(vec2(-1.0, f))) * 2.0 - 1.0 - p), 0.0); 
        // c에 랜덤한 벡터와 원점 사이의 위치값을 반환한다. - 원 그리기
        // max를 이용해 0보다 높은 값만 더한다.
    }


    gl_FragColor = vec4(vec3(smoothstep(0.1, 0.6, c), smoothstep(0.4, 1.0, c), smoothstep(0.8, 1.0, c)), 1.0 ); // 적색 그라데이션
//  gl_FragColor = vec4(vec3(c, c, c), 1.0 ); // 흑백

}
Tags : #shader

원 그리기

Glsl Sandbox에 접속해서 Create new effect! 버튼을 눌러 다음의 코드를 넣자.

마우스의 움직임에 따라 패턴이 달라지는 기본 코드인데, 지금 이해하기에는 어려움이 있으니 아래의 코드를 복사해 넣자.
다음의 기본적인 코드를 복사해 붙여넣자.

#ifdef GL_ES
precision mediump float;
#endif

uniform float time;
uniform vec2 resolution;

void main( void ) {
    vec2 position = ( gl_FragCoord.xy / resolution.xy );
    position = 2.0 * position - 1.0;
    position.x *= resolution.x / resolution.y;

    float color = 0.0;
    float d = length(position);
    d = distance(position, vec2(0,0));
    color = d;
    gl_FragColor = vec4( color, color, color, 1 );
}

image

이런 화면이 나올 것이다. 한줄씩 침착하게 나아가자. 한줄씩 지워가며 속성을 이해해 볼건데, 실제로 지워버리면 나중에 다시 써야하니 주석으로 막으면서 해보도록 하겠다.

10번째 줄과 11번째 줄의 앞에 ‘//’를 넣어보자

//position = 2.0 * position - 1.0;
//position.x *= resolution.x / resolution.y;

해당 줄을 주석으로 바꾼 것이다. 다시 ‘//’를 제거하면 다시 원래대로 동작하니 모르는 코드가 있을 때 하나하나 스위치를 꺼고 켜듯이 주석처리를 해서 이해해 볼 수 있다.

Tags : #shader

2014-09-27_13-06-54

http://glslsandbox.com/e#20203.2

#ifdef GL_ES
precision mediump float;
#endif

uniform float time;
uniform vec2 resolution;

void main( void ) {

     vec2 p = ( gl_FragCoord.xy / resolution.xy );
     p = 2.0 * p - 1.0;
     p.x *= resolution.x / resolution.y;

     vec3 bg = vec3(1);
     vec3 color = vec3(0.0);

     // 적색원
     vec3 c1 = vec3(.8, 0, 0); // 색상
     float timev = mod(time / 2.0, 0.5); // 시간1
     vec2 m1 = vec2(timev, timev); // 원의 위치
     float d1 = distance(p, m1); // 모든 점에 대하여 원의 위치까지의 거리 ; 원의 줌심이 1, 멀어질수록 0이 되는 그라데이션값
     d1 = smoothstep(0.2, 0.25, d1); // 그라데이션을 제한하여 원처럼 보이게 한다.

     // 녹색원
     vec3 c2 = vec3(0, .8, 0); // 색상
     float timev2 = mod(time, 0.5); // 시간1
     vec2 m2 = vec2(timev, 0); // 원의 위치
     float d2 = distance(p, m2); // 모든 점에 대하여 원의 위치까지의 거리 ; 원의 줌심이 1, 멀어질수록 0이 되는 그라데이션값
     d2 = smoothstep(0.3, 0.35, d2); // 그라데이션을 제한하여 원처럼 보이게 한다.

     color = mix(bg, c1, 1.0 - d1); // 배경색과 적색을 합성하고 그 범위를 적색원 만큼 채운다
     color = mix(color, c2, 1.0 - d2); // 적색과 녹색을 을 합성하고 그 범위를 녹색원 만큼 채운다

     gl_FragColor = vec4( color, 1.0 );

}

2014-09-27_13-01-08

http://glslsandbox.com/e#20203.1


#ifdef GL_ES
precision mediump float;
#endif

uniform float time;
uniform vec2 resolution;

float hash(float n){
    return fract(sin(n) * 45323.2);
}

void main( void ) {

    vec2 p = ( gl_FragCoord.xy / resolution.xy );
    p = 2.0 * p - 1.0;
    p.x *= resolution.x / resolution.y;

    vec3 bg = vec3(1);
    vec3 color = vec3(0.0);

    for(int i = 0; i < 10; i ++){

        vec3 c1 = vec3(1, 0, 0); // 공의 색상
        float t = mod(time, 5.0); // time%5초 - 시간

        float vx = hash(float(i))*t; // 점 마다의 속력 hash에 넣어 랜덤하게 생성
        float px = 0.0 + vx-1.0;  // 점의 x위치
        float py = float(i)/10.0-.5; // 점의 y위치

        vec2 m1 = vec2(px, py); // vec2에 저장된 위치

        float d1 = distance(p, m1); // 중심점과 모든 픽셀과의 거리 : 중심은 1로, 멀어질수록 0이 되는 그라디언트가 된다.
        float r = hash(float(i))/5.0; // hashing된 반지름 
        d1 = smoothstep(r, r+0.01, d1); // 그라디언트의 범위를 줄여 원으로 보이게 만든다.

        color = mix(color, c1, 1.0 - d1); 
        // 모든 색상값을 합친다. 모든 원들이 한번에 보일수 있게 한다. 기존의 색상에 새 색상을 합쳐고, 마스킹을 새 색상의 범위(새 원)만큼 제한한다.
    }
    gl_FragColor = vec4( color, 1.0 );
}
Tags : #shader